In this tutorial, we’ll show you how to create a Microsoft SQL Server database in Azure.
We assume you already have a Microsoft Azure account and the necessary subscription. If not, check out our previous article on the Microsoft Azure Pass – Free Subscription.
Why Choose Microsoft Azure? Microsoft has heavily invested in Azure’s cloud technology, making it a top choice for organizations. Azure offers:
Unmatched Scale and High Availability: Reliable and scalable cloud infrastructure.
Advanced Data Security: Robust protection for your data.
Flexible Pricing: Cost-effective options for a powerful relational cloud database.
Modernization of Existing Investments: Seamlessly integrates with your current systems.
User-Friendly Interface: Easy to navigate and use.
Frictionless Migration: Simplifies the process of moving data.
Built-In Machine Learning: Leverages AI for enhanced functionality.
Creating a SQL Server Database in Azure
Before creating a SQL database, review the pricing options available here. Choose a package that fits your business needs, and proceed with database creation. If you have an Azure Pass subscription, you’re all set.
For trial or educational purposes, start with an Azure Pass or Microsoft’s free credits, and then consider a full subscription based on your data volume and business requirements.
Step 1
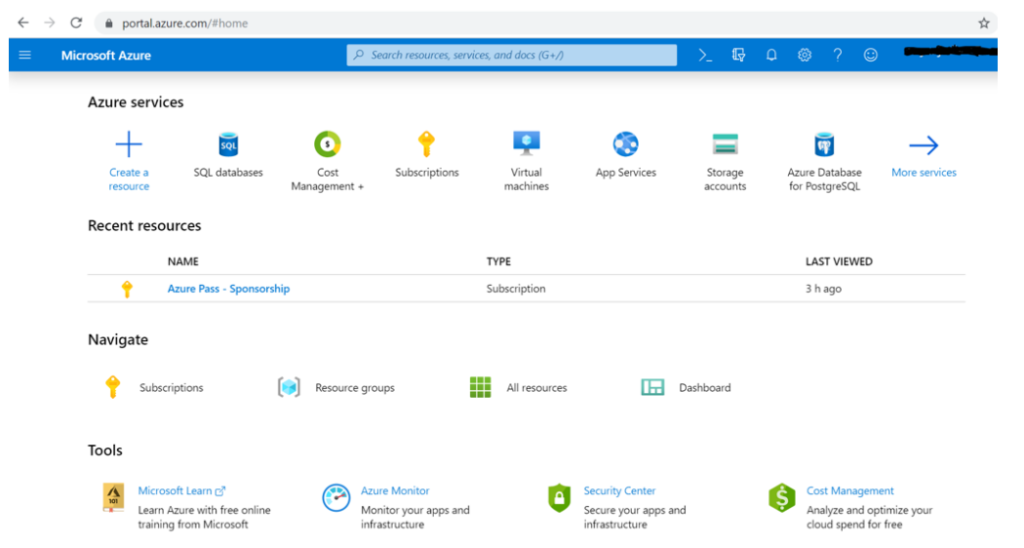
Log on to Microsoft Azure Pass portaland navigate to Home Page. Click on “Create A Resource”
Step 2
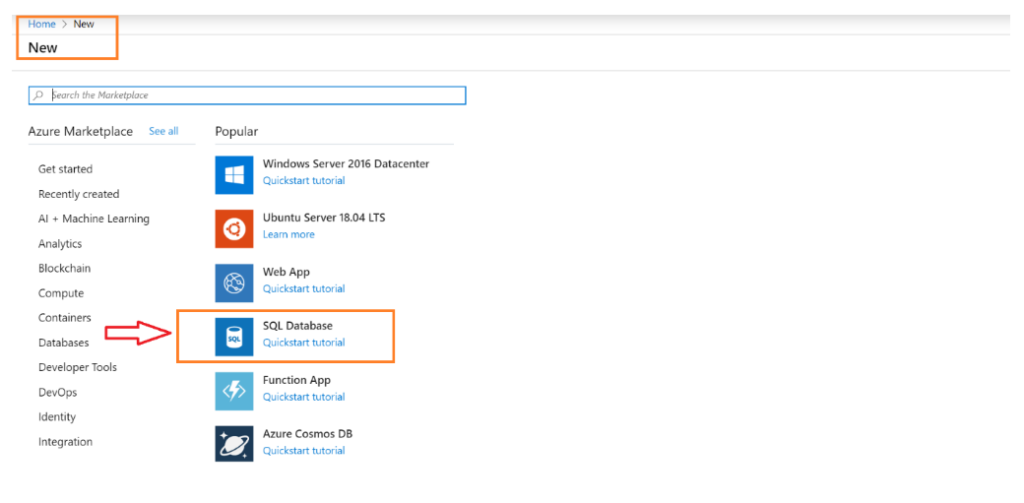
Click on Create A Resource – Select SQL Database and fill the required fields.
Step 2.1
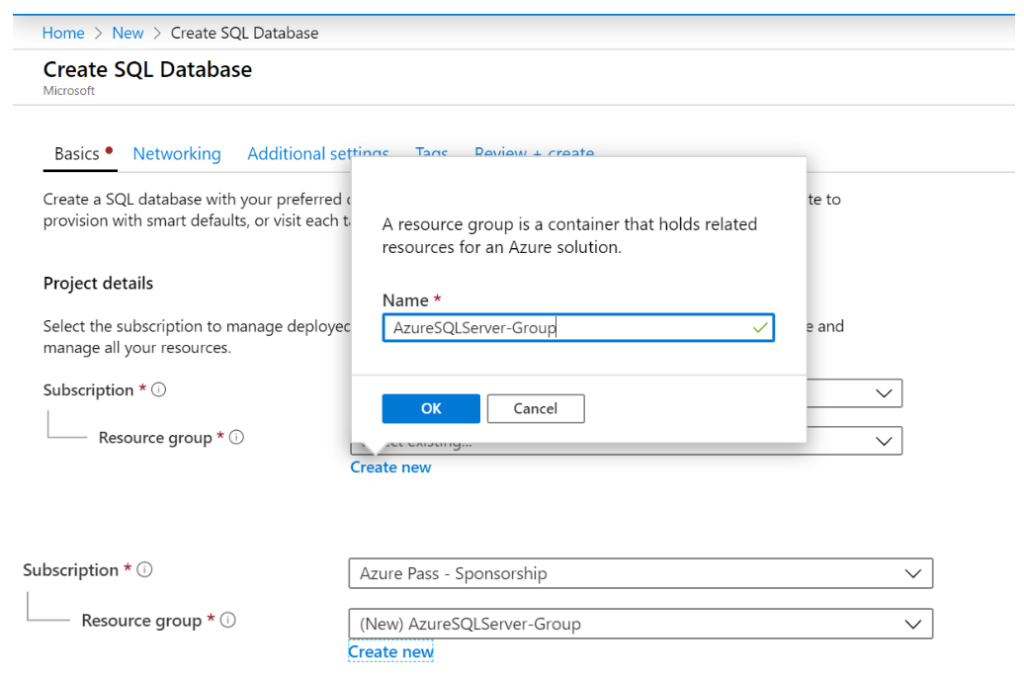
Project details : Select the subscription to manage deployed resources and costs. Use resource groups like folders to organize and manage all your resources.
Subscription: All resources in Azure subscription are billed together
ResourceGroup: A resource group is a collection of resources that share the same lifecycle, permissions and policies.
We have selected “Azure Pass- Sponsorship” as we have only Azure Pass – Sponsorship. You may choose your own different Subscription.
At this moment we have not yet created any resource group. Let’s create new Resource Group. Click on Create New and put name as “AzureSQLServer-Group” & Click OK
Step 2.2
• Database details: Enter required settings for this database, including picking a logical server and configuring the compute and storage resources. • Database Name: Enter your Azure SQL Server Database Name as per your choice. Let’s name it as – “MyAzureSQLServer-Database” • Server: Select an existing server or create a new server. The condition string and credentials will be based on the sever.
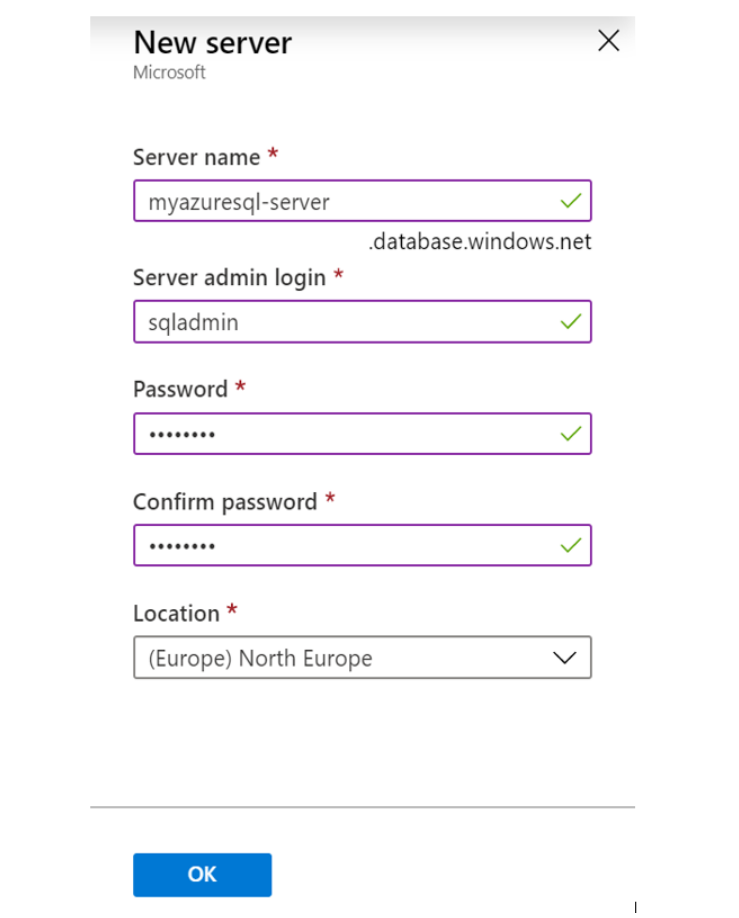
At this point we still do not have a SQL Server, lets create new one. We need to create new one but before that have a look at the rules.
Server name should not contain reserved words.
Your server name can contain only lowercase letters, numbers, and ‘-‘, but can’t start or end with ‘-‘ or have more than 63 characters.
Click on Create New and put name as “myazuresql-server” , create Admin user account (username and password) and choose preferred Location.
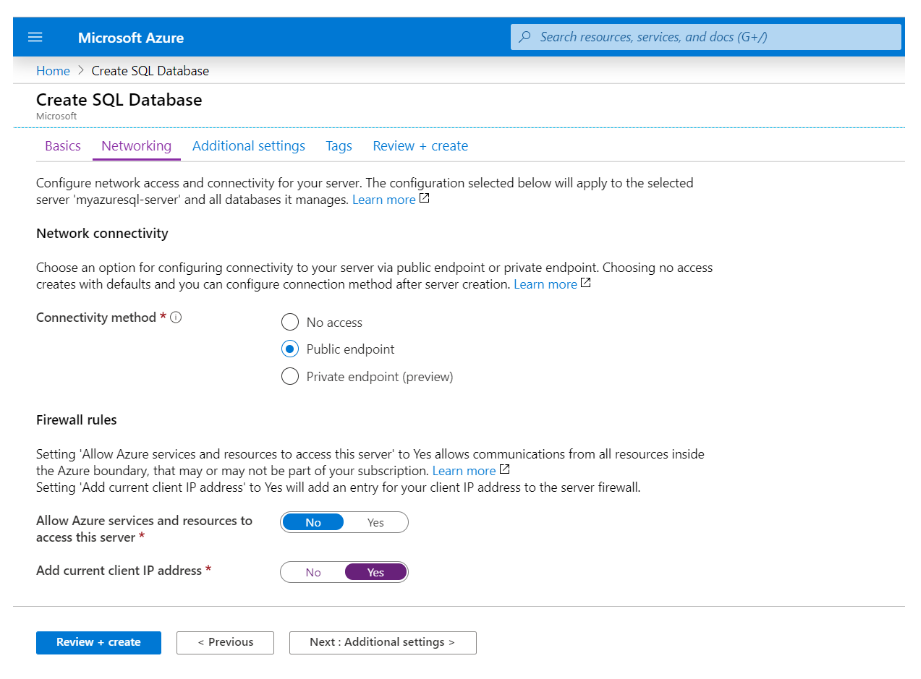
Step 2.3
Click on Next: Networking– You may select any preferred Connectivity Settings as per your business environment security model.
We have selected “Public end point” and enabled “Add current client IP address” hence we can able to connect to SQL Server database anytime using current client machine only.
Step 2.4
Tune your Advanced network setting through addition settings. Observed we have selected following basic options.
Backup: None
Collation: SQL_Latin1_General_CP1_CI_AS and
Enable Advanced Data Security: Not Now
Collation:
Database collation defines the rules that sort and compare data and cannot be changed after database creation. The default database collation is SQL_Latin1_General_CP1_CI_AS.
Enable Advanced Data Security:
A unified security package for discovering and classifying sensitive data, surfacing and mitigating potential database vulnerabilities, and detecting anomalous activities that could indicate a threat to your database.
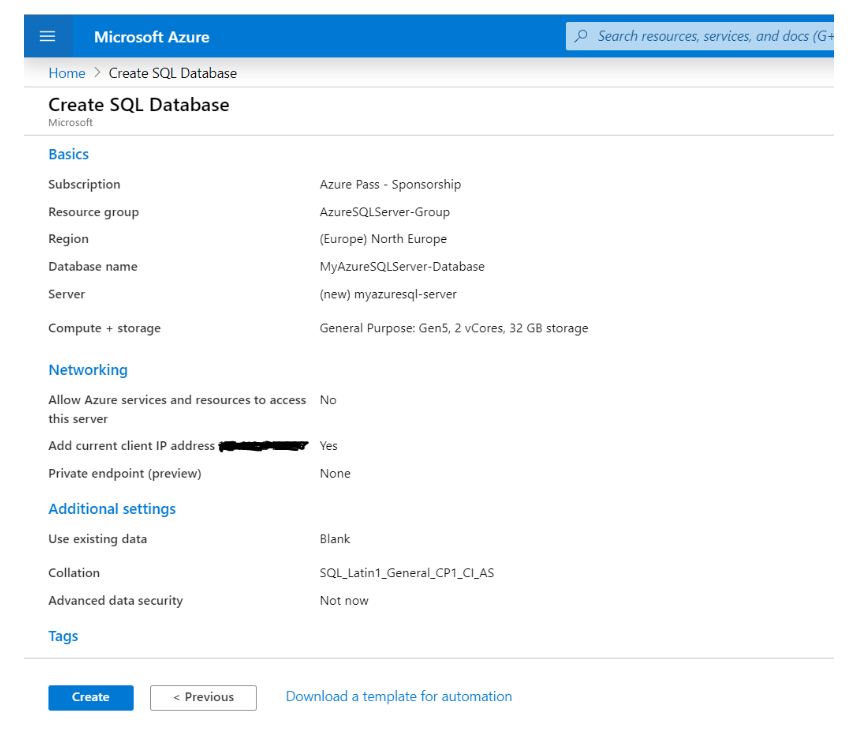
Step 2.5
Click on “Review and Create” and your new SQL Server “myazuresql-server” and database “MyAzureSQLServer-Database” will be deployed in Azure.
Congratulations!!
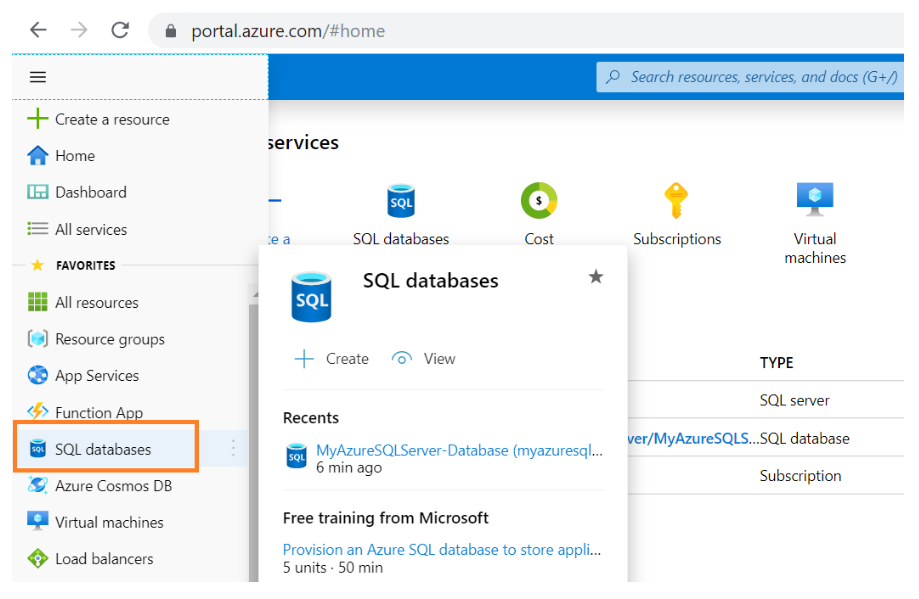
New Microsoft SQL Server and Database are successfully deployed. Verify your new Microsoft Azure – SQL Server & Database:
Access your newly created SQL Server Database and SQL Server once just by clicking on them and then you will see those components under your recent accessed resources list on Azure Portal Dashboard.
Latest Overview of Azure Portal:
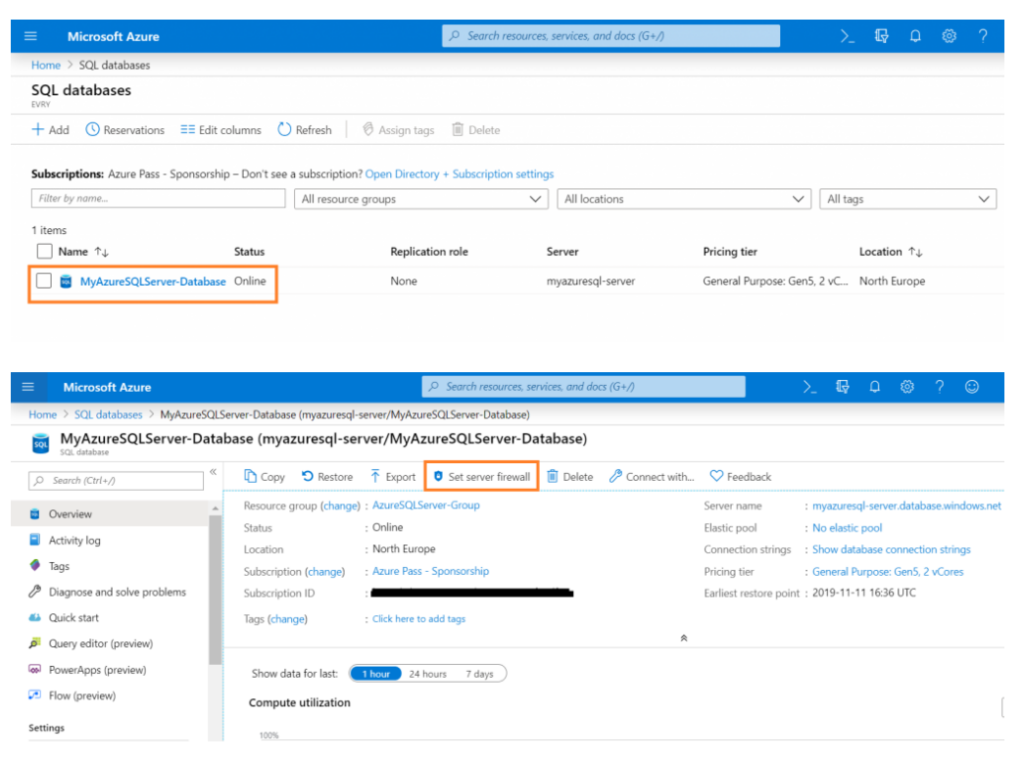
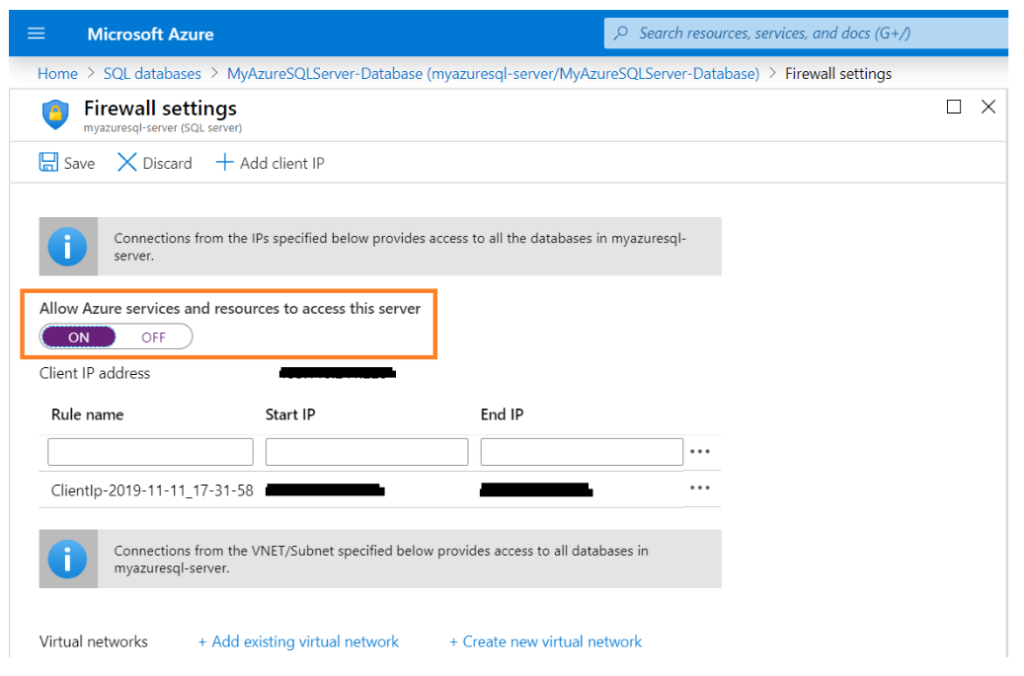
Verify Azure SQL Server Firewall Rules
In order to access Azure SQL Server database from SQL Server Management Studio (SSMS), you need to set up some firewall rules. Verify your firewall rules and set up accordingly if anything missing for you.
1. Navigate to Home in Azure Portal and click on SQL Database
2. Click on your Azure SQL Server Database Name – MyAzureSQLServer-Database & Click on “Set Server Firewall”
3. Ensure you have “Allow Azure services and resources to access this server” set – ON